Written by : humayrarumaysa
Title : the finished front
the finished front
Five big projects have been (mostly) finished at the front of the house: fieldstones under the porch, antique cobblestone walkway, new garden bed, new sod, new gravel drive...
so now only
1, 527 more projects to go!!
Click to see the "before" photos.
We had originally hired a stone mason to construct the stone skirt under the front porch, and the cobblestone walkway from the front porch to the gravel drive. He was an "unusual" chap (to put it politely), but he was the only one of the three we interviewed that brought a portfolio for us to look at, and, most importantly, his price was right! Turns out he had a wee bit of a drinking problem, and by day two had been relieved of his duties. If it wasn't so pathetic, the beer can he attempted to hide under the shrub while working might have been comical. Luckily for us, on day one of the job the stone mason (and his helper, i.e. driver) had some business at the DMV and arrived sober and worked like the wind getting the front-facing stone wall put in during the morning and early afternoon. After their return from a long lunch the job (and their speech) moved a bit slower, but still moved along. Day two we were not so lucky, and only got a "start" on the end cap of the porch.
All, I can say at this point, is thank goodness for a very handy, talented husband who then put in the whole cobblestone walkway by himself, and is working on finishing the stone end cap on the porch!

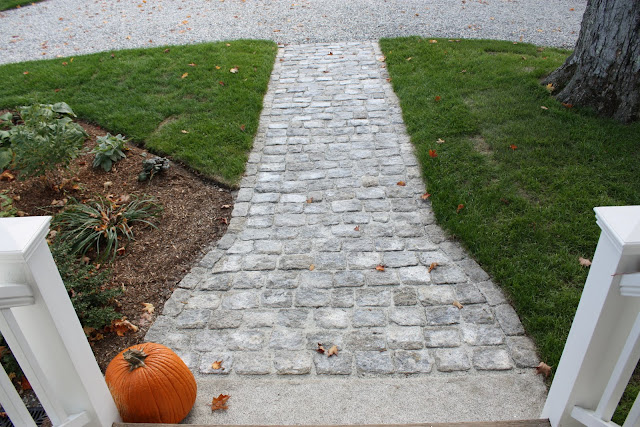
In this photo you can see the different stones and textures, and how they play off one another: fieldstones under porch, cobblestone walk, and gravel drive, and how pretty they all look with the new sod!

Here you can see the wonderful color variation from the antique cobblestones which were originally from a street in Massachusetts.

 |
| Add caption |
Close up of the fieldstone skirt. All of the stones are from our property.
There are several different ways one can install a stone wall, one is with mortared joints, another is dry-stacked. Since the antique stone walls that run along our property line are dry-stacked we chose that look. This is actually a variation, it is mortared in from behind the stones for structural support. If you look back at the before photos you can tell what a huge improvement this stone skirt is!

I designed the walk to have a flair at the top (that part was really fun for Dan!!) The new bed to the left looks like it is very angular in this photo, but it is actually only the new sod that is giving it that effect. It has, in reality, a rounded corner.
The front with the new gravel driveway. The gravel reads white in this photo, but in person it has much more gray in it. It is still a little "dusty" as it was crushed at a near-by quarry just for our project. To take this photo I was standing in one of the two "bays" that make up what we refer to as "the parking pad." The driveway ends here at the house where I am standing taking this photo and at the edge of the photo on the right side.

I realize the bed doesn't look like much now, but I promise it will be really pretty next year! The bed is filled with shrubs, and perennials and next year we'll add annuals. It will bloom predominately white, with soft pinks and purples/blues as accents.

If you follow the driveway straight and then turn left (behind the white adirondack chairs you can see in the middle of the photo on the left) the drive takes you to the road, if you were to turn right it would take you down to the garage which is underneath the barn. The dirt you see on the left side of the drive will be seeded within the next couple of days; we are just getting it done before the cut off time for putting down seed.


Rainbow over the east meadow!


Thus our article entitled the finished front,do you like the article hopefully this article can benefit you all.
You are reading the article the finished front and this article the permalink url is http://humayrarumaysa.blogspot.com/2010/10/the-finished-front.html Other articles you are looking for xxxxx