Written by : humayrarumaysa
Title : A progress report.
A progress report.
Things are really happening fast around the house! Everything is going very well and we are making lots of progress. We are at a point were you can finally get a tiny, little glimpse that we might, just might be on the home stretch!
Since my last post:
Since my last post:
- most of the rooms in the farmhouse (with the exception of the kitchen, the master and guest baths) have received one coat of wall and ceiling paint and one coat of trim. After the floors are finished the final coats will go on the walls, ceiling and trim. Post on Paint to follow!
- the floors on the second floor have been sanded and as of today they can't be walked on until they get stained. Sanding of the first floor began today. The sanders use a dust-free sanding machine that is amazing! No dust at all- none! The floors will be stained a medium brown that has honey undertones, and then will have a tung oil finish, using four coats of low-VOC tung oil. The finish guy brought by about 6 different samples after I had explained what I was looking for, and immediately I honed into this one particular stain that read "exactly as I had envisioned!"
- showers have been tiled. Guest bath marble floor has been laid.
- beadboard and trim is going in in both the master and guest bathrooms. All new windows are being trimmed to match the original farmhouse window frames.
- the garage floor has been dug out and the concrete is almost ready to to be poured for the floor. Retaining walls in the garage area were installed to reinforce the original antique granite stone walls.
- I set the kitchen soapstone and marble templates on the stones at the fabricators today. All stone will be delivered next Monday!
- the underground electrical lines have been pulled and we are just waiting for the electric company to come to hook it all up. Then we can pull down the current overhead lines.
The magic "no-dust" sanding machine! The original honey finish is seen on the edge which was then sanded by hand.

Sanded guest room floor. All the "dots" in the photo are the antique square-head nails that have been counter-sunk.

This is a sample of my "new" choice of marble for the kitchen island . The left side shows it polished; and the right shows it honed. I am having it honed.
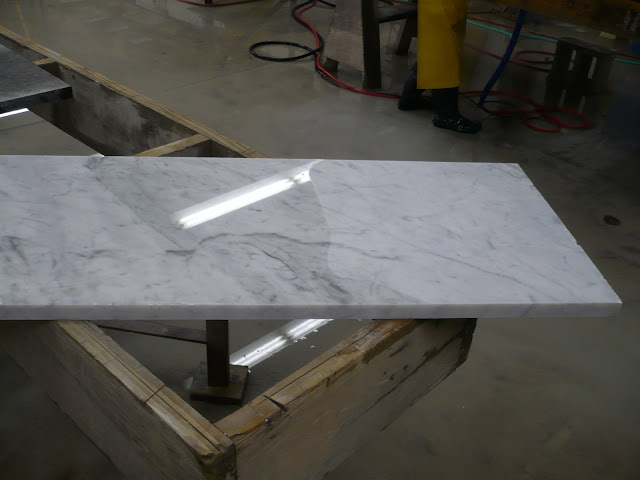
This is my new choice of marble for my kitchen island. The piece of cararra marble that I had originally picked out had a fissure in it and my fabricator decided it was too much of a risk and would probably break, so I chose this marble piece which is called Bianco Venatino (... sadly, this choice also doubled the price of my island from the cararra- but what's a girl to do when one falls in love with a piece of marble?!!) The darker portion shows my template and placement for cutting. The slab is currently polished, but will be honed for installation which will soften the veining.

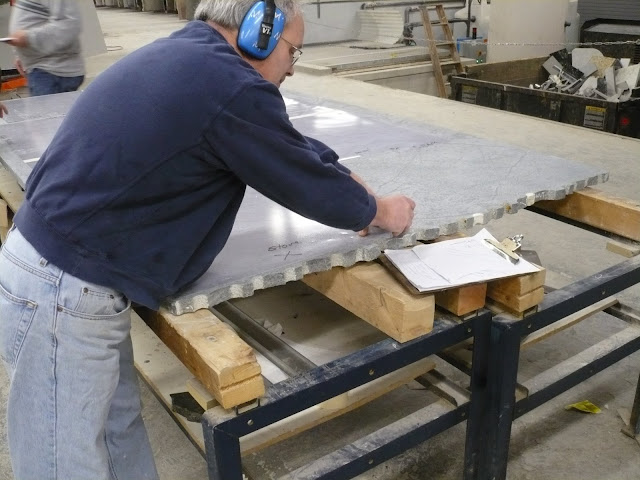
The stone fabricator's shop. My soapstone is templated and laid out in the bottom left of the photo.

Templated soapstone.

Fabricator marking my templates! I used two full (extra large sized for soapstone) slabs for the perimeter countertops in the kitchen. You can see how close he is to the edge. We had very little waste.
Marble slab with my cut-out for the sinks in my master bath vanity top. We chose to place the faucet and hot/cold water valves on angle to the basin (as opposed to a straight line) which looks more authentic to an antique house.
This is the piece of marble that we chose to place on top of two chests-of-drawers that will sit in the middle of the master closet. The upstairs laundry room is just outside the master closet in the master bath, and this way I can just march the clean clothes to this marble top- fold/hang and be done with them! The marble is Breccia Oniciata. I love coral and this slab has a beautiful coral color to it.

Our driveway, aka-the parking lot of contractors! (there are at least 7 cars/trucks that you can not see in this photo!) God bless 'em for showing up every day to get this house completed!

This photo shows the 2-plus feet of dirt that was dug out to make room for the new garage floor.

One-sided forms for concrete walls which were poured to reinforce the original granite foundation in the garage/original barn foundation.

The concrete truck!

Our concrete guys "hand pouring" the retaining walls. The guy on the right is the owner and he almost came to blows today (for a different pour) with the concrete driver man because he was mixing the concrete too wet and it wasn't to his exacting standards!

Look how gorgeous the wall turned out! I love how the new concrete wall conforms to the original stone. Dan & I both thought the garage would be functional; we didn't realize that it would also end up being beautiful! The floors will have radiant heat which will help to keep the floors dry in the winter months when snow can drop from the car and then melt/freeze on the floor and then make you slip and break your finger.... Dan is also putting in floor drains and a hot and cold water tap so he can hose off snow from the cars. For those of you who don't live in a wintry climate, the salt and sand they put on the road to make travel safe can wreck havoc on your car's paint job!

The concrete guys were really proud of their work, and rightly so, as it turned out beautifully. All the subs on the job have "garage envy"!!!


Thus our article entitled A progress report.,do you like the article hopefully this article can benefit you all.
You are reading the article A progress report. and this article the permalink url is http://humayrarumaysa.blogspot.com/2009/03/a-progress-report.html Other articles you are looking for xxxxx